menu

Showing posts with label SMTP. Show all posts

Tuesday, November 11, 2014

Using UMS In SOA

Introduction:

     I'll try to explain how to use UMS which is an email adapter in SOA Suite environment today. We'll use Apache James Server as the email server and you can get the information about the installation and the configuration of Apache James Server in this previous write.Let's first start with the configuration of enterprise manager and console.

Configuring Enterprise Manager and Console:

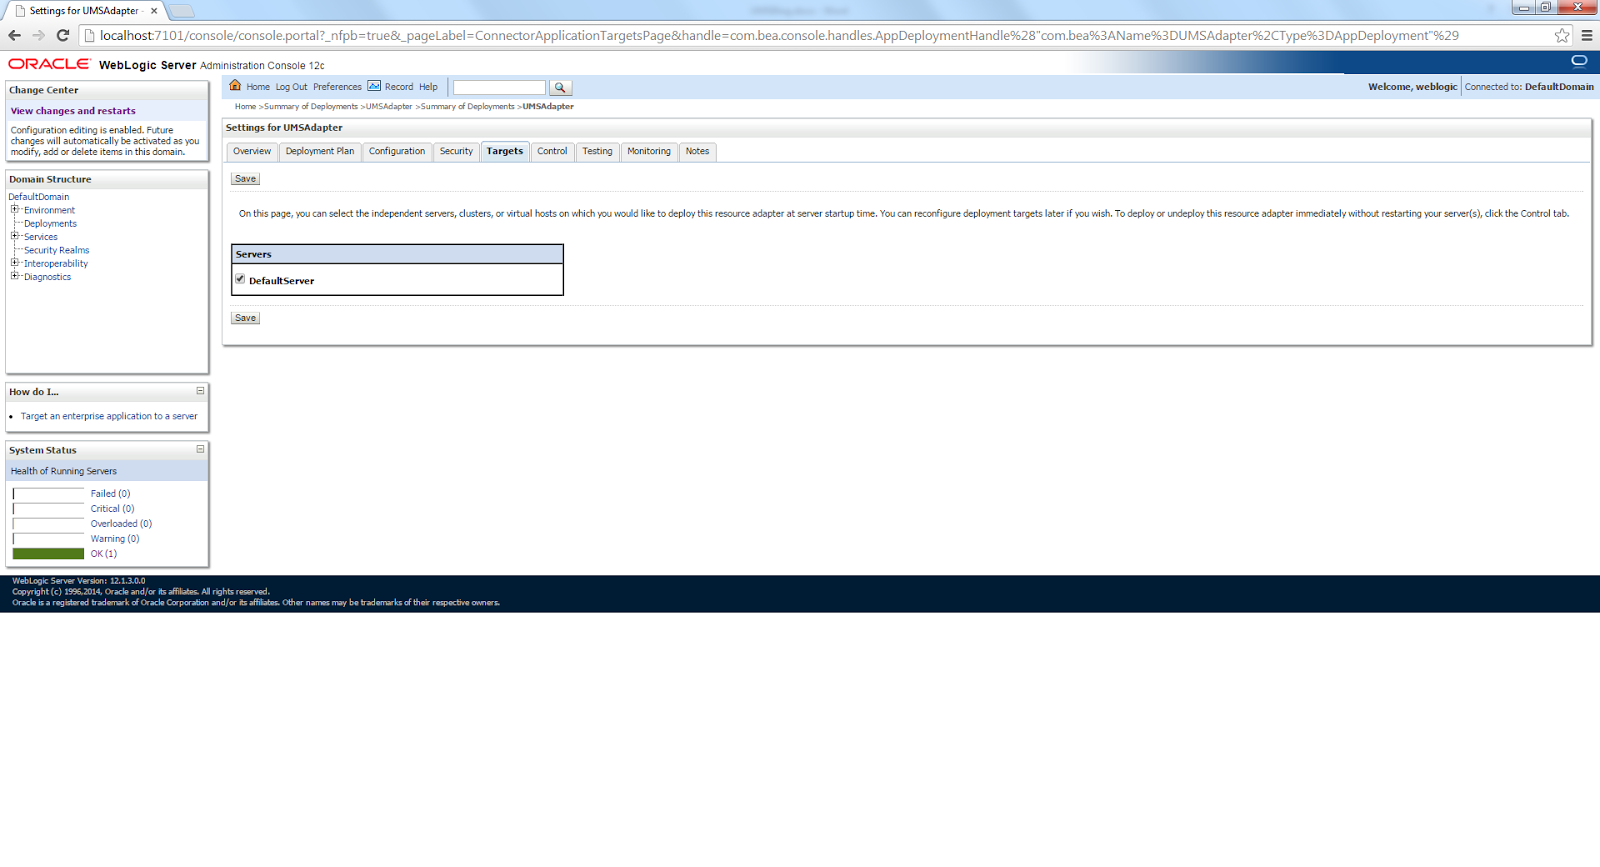
     You first start your weblogic server and then to go http://localhost:7101/console.Click on the "Deploymenys" link in the left "Domain Structure" menu and choose the UMSAdapter in the right side.You may have to click the next button many times.Then go to the "Targets" tab and check the DefaultServer to target our Ums adapter to our server.See in Figure 1 and 2. 


Using UMS In SOA
Figure 1

Using UMS In SOA
Figure 2

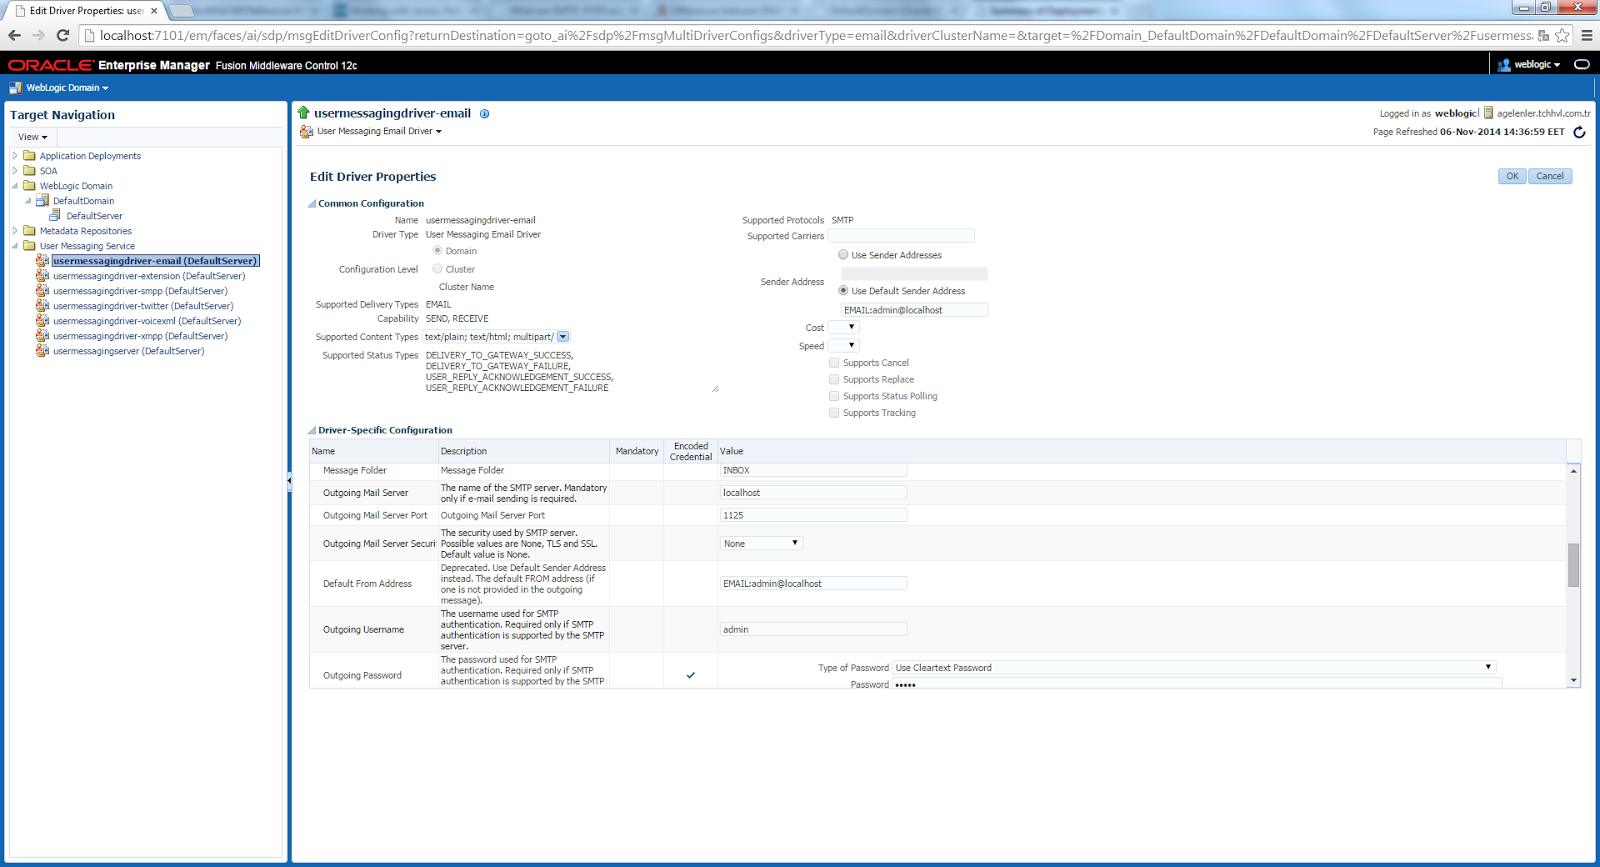
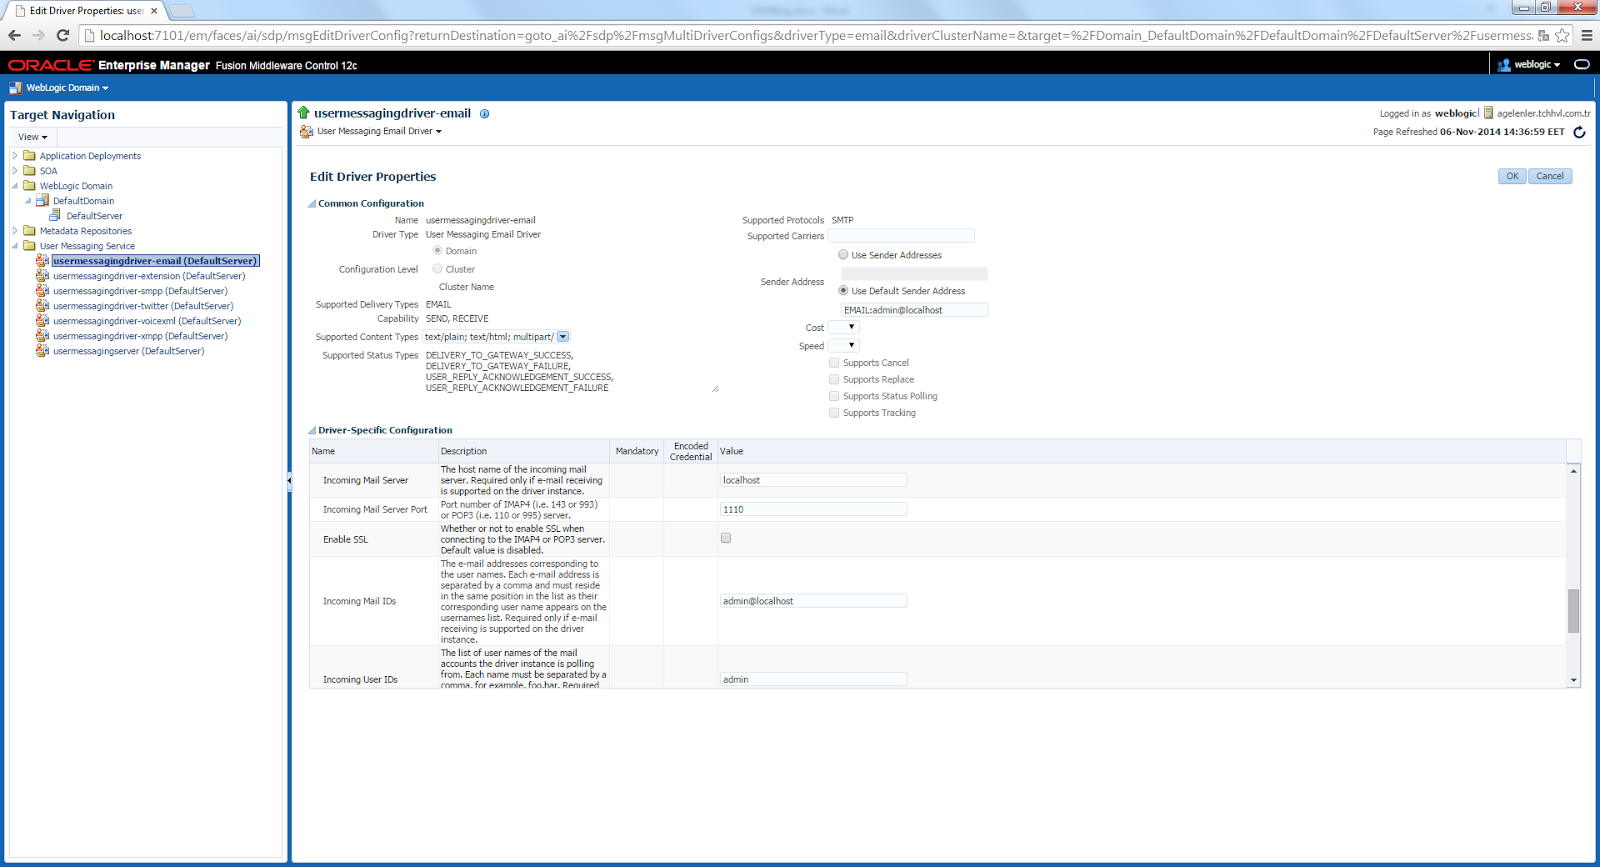
Now we can go to http://localhost:7101/em and right click to the User Messaging Service -> usermessagingdriver-email and choose "Driver Properties".You will see the screen in Figure 3 and 4.At this point you have to configure the Apache James server and create two email users admin and test.To do that you can refer to the following write.http://aligelenler.blogspot.com/2014/11/using-javamail-api.html. After configuring James server and creating email users, you will enter the required values to the screen below like sender address as admin@localhost, mail server as localhost, mail server port as 1125, incoming mail server port as 1110.See in Figure 3 and 4.

Using UMS In SOA
Figure 3

Using UMS In SOA
Figure 4

Creating the Bpel Process with Ums Adapter:

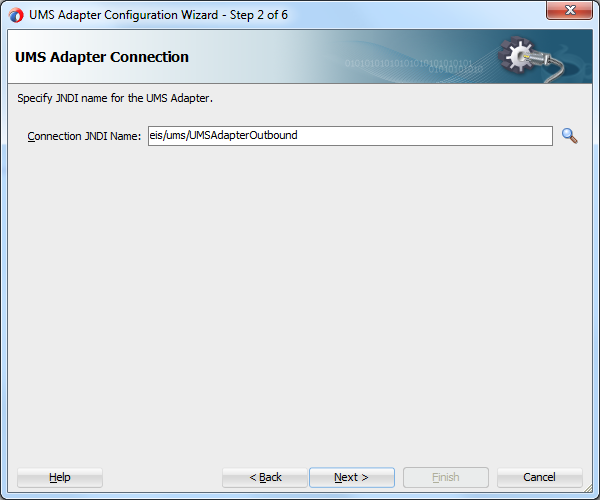
     Create a bpel process and in the right external references part right click and create an UMS Adapter.In the first page of the create wizard choose the JNDI Name eis/ums/UMSAdapterOutbound as in Figure 5.


Using UMS In SOA
Figure 5

In the next page choose Outbound Send Nofitication as the operation type.

Using UMS In SOA
Figure 6

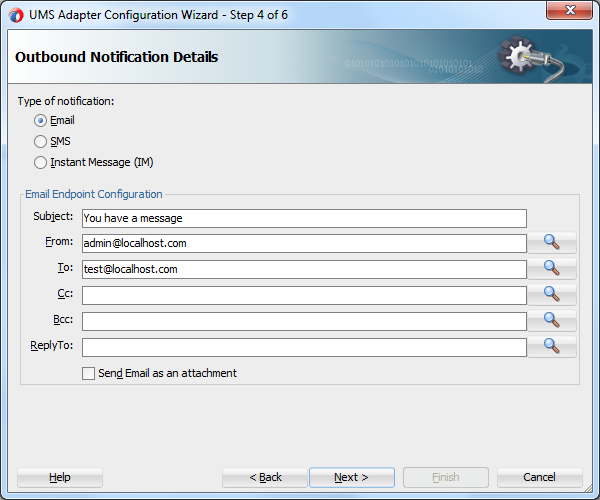
Now you will choose Email as the type of notification and enter the Subject , From and To configuraton variables. At this point we'll do a trick and enter the admin and test email addresses ending with .com, although they are not ending with .com. That's necessary since the wizard doesn't allow you to continue if the email addresses doesn't contain .com or any other email extensions.However we have to delete this .com parts at the end of the wizard in the jca source file, otherwise Apache James server will not accept those email addresses.

Using UMS In SOA
Figure 7

Choose the message as String type as in Figure 8.

Using UMS In SOA
Figure 8

Delete the .com parts in the jca source file.

Using UMS In SOA
Figure 9

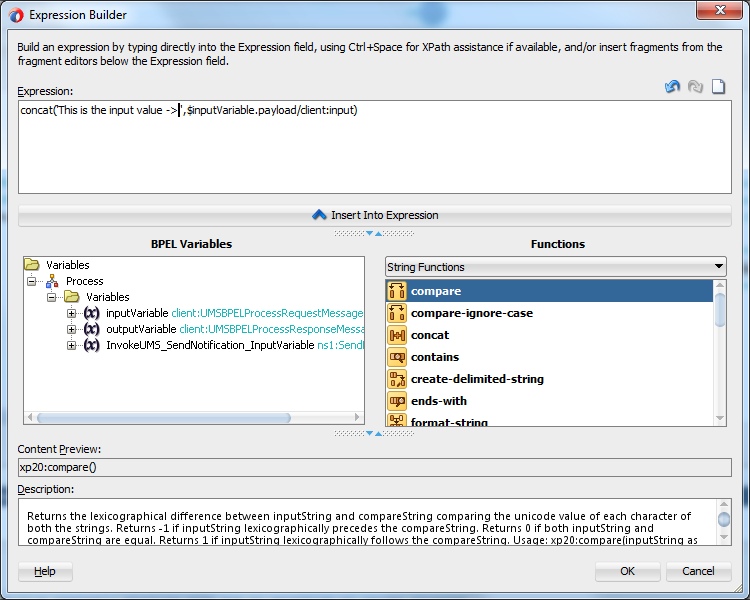
Now drag and drop an assign activity after the ReceiveInput and build the email text using concat as in the following figure.

Using UMS In SOA
Figure 10

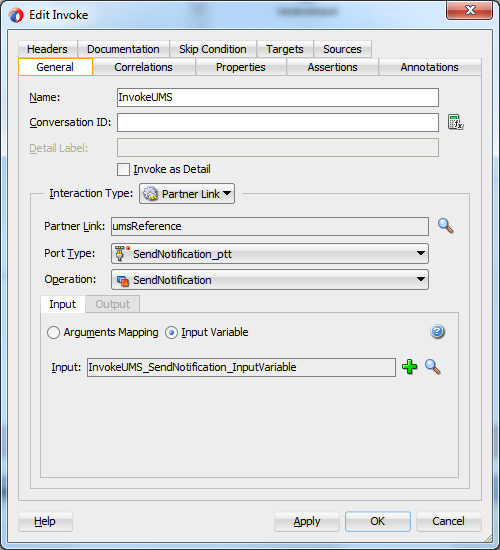
Drag and drop an invoke activity referencing it to the Ums adapter and creating the input values like in Figure 11.

Using UMS In SOA
Figure 11

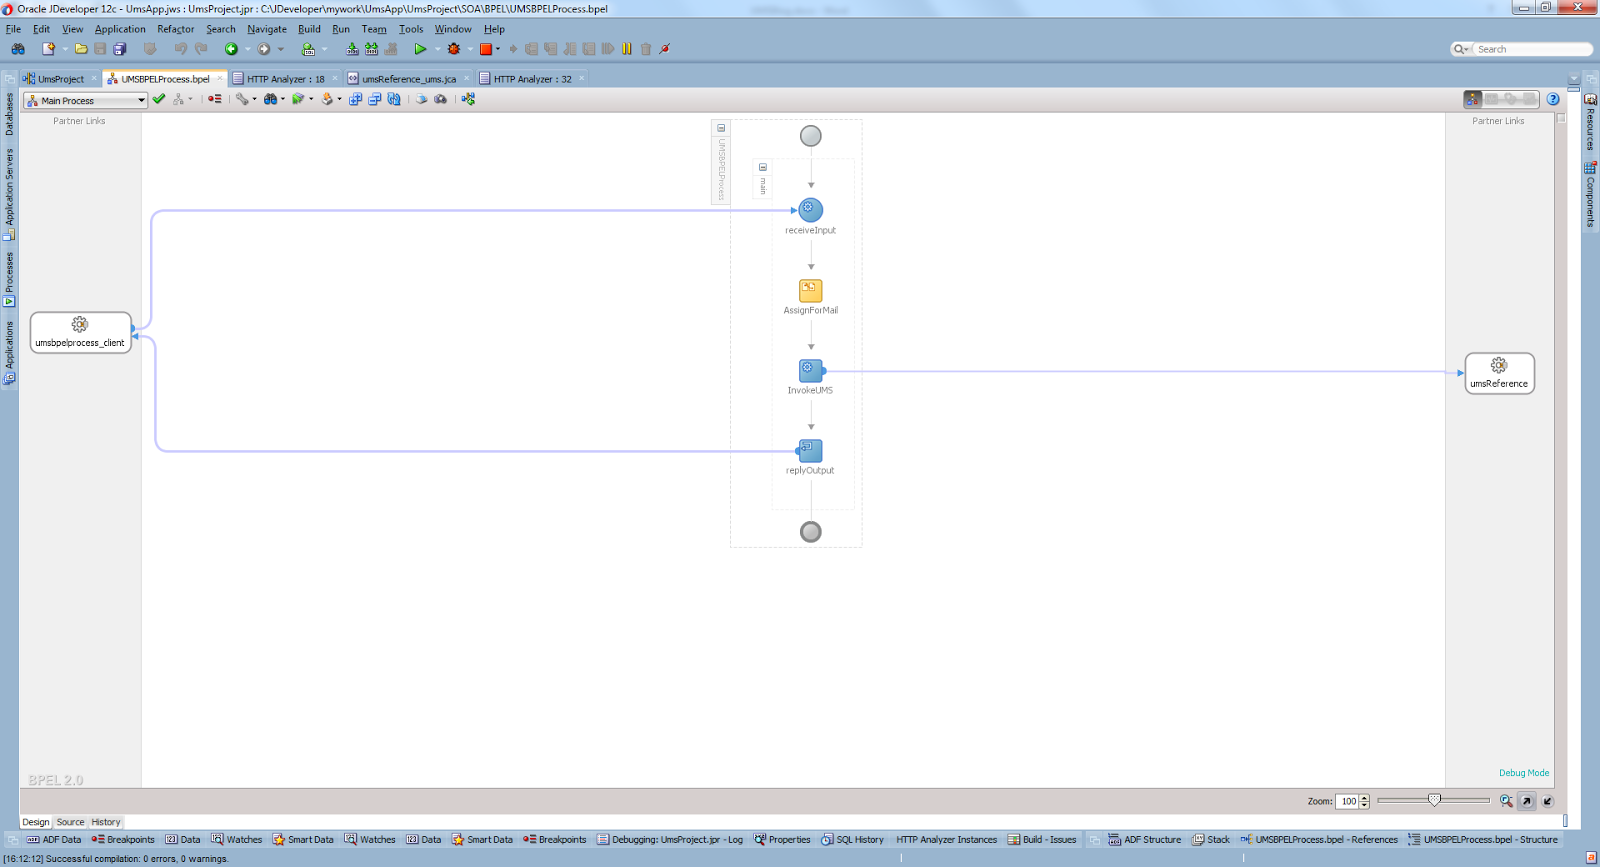
The final bpel process should now look like as in Figure 12.

Using UMS In SOA
Figure 12

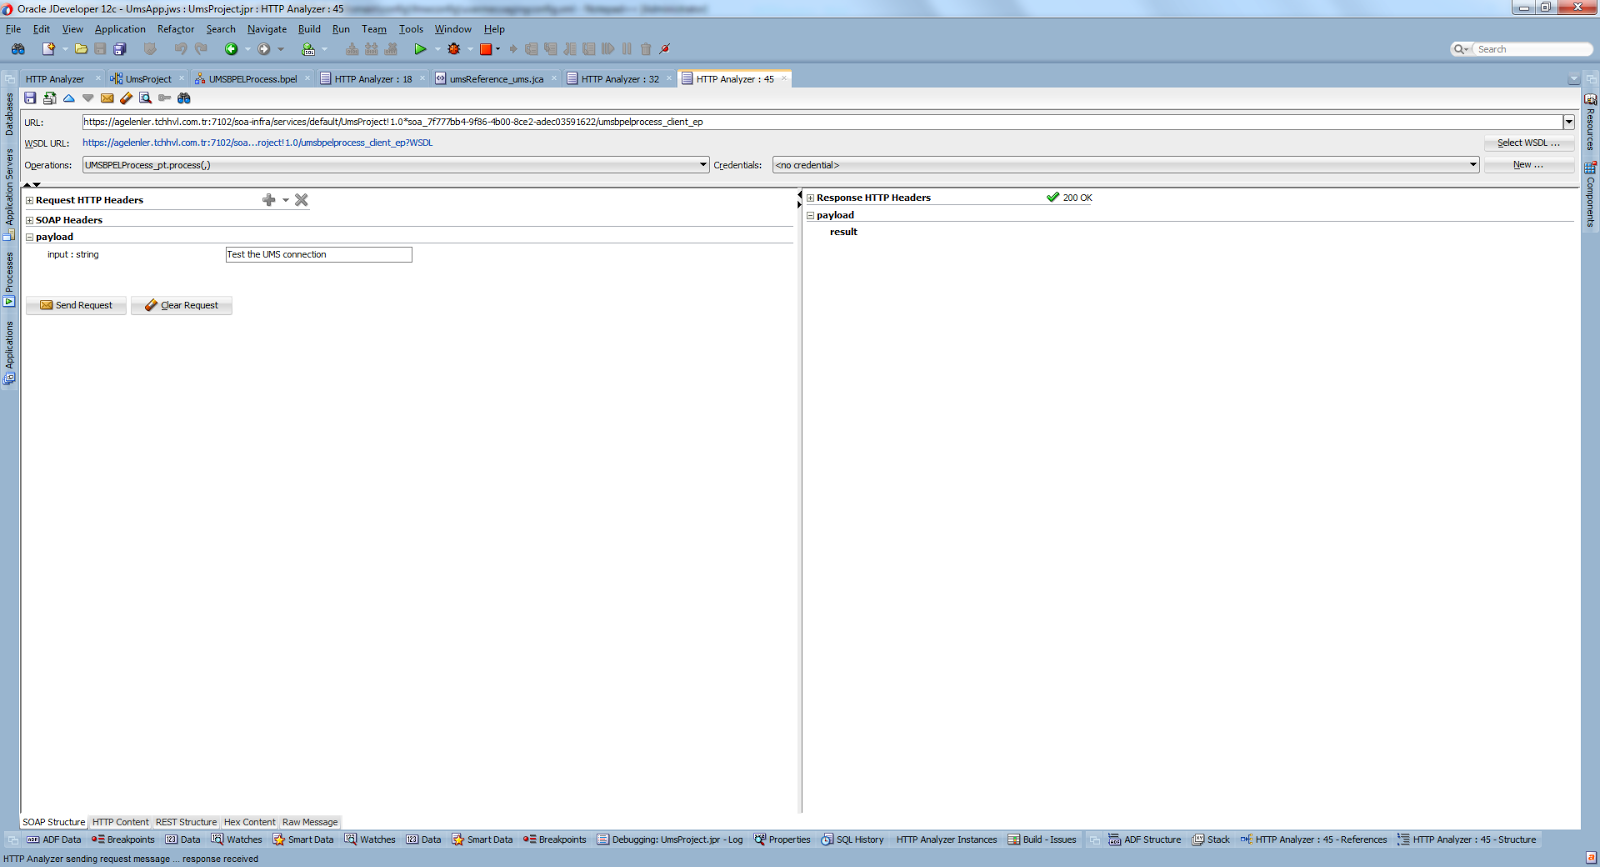
Test the application using the Jdeveloper Debug tool and enter the input value in the Http analyzer screen.See in Figure 13.

Using UMS In SOA
Figure 13

Inspect the Sent Email:

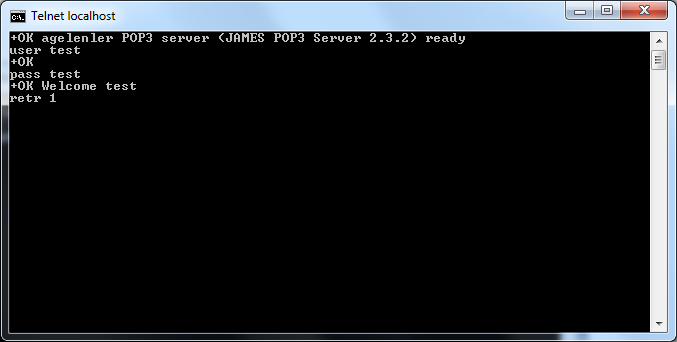
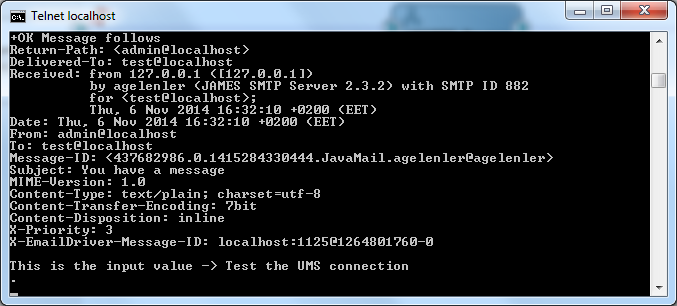
     Open a command window and type the following commands in Figure 14 and 15.You will see your email content like in Figure 16.

Using UMS In SOA
Figure 14

Using UMS In SOA
Figure 15

Using UMS In SOA
Figure 16

Conclusion:

     Today I try to explain the usage of UMS adapter in SOA Suite environment using Apache James Server.As you can see, with the help of the UMS adapter it is quite straightforward to use email functionality in SOA applications.

You can download the source code from here.

Monday, November 10, 2014

Using Gmail Servers in JavaMail API

Introduction:

     In the previous post we mention about the basics of email protocols and show how to configure Apache James server to use in JavaMail API.Today we see how to use Gmail servers instead of using local Apache James server.The JavaMail API part is same but we have to configure the properties of the email session according to Gmail servers in addition to obtaining an application password from the gmail.

Obtain Application Password:

     First of all, we have to get an application password to use in our JavaMail API. When we try to use our gmail password an error occurred indicating "Username and password are not accepted" giving the following link.
http://support.google.com/accounts/bin/answer.py?answer=185833
This link says that you have to create an application password instead of using the gmail password for security reasons. Follow the steps shown in the link and create your application password.

Sending Mail Using Gmail SMTP Server:

      The following java code can be use to send an email using Gmail SMTP server.If you want to use SSL enabled you have to comment out  line 3 and 4 while commenting the line 1 and 2.As you can understand while the SMTP port of Gmail is 587 when you enable SSL it is 465.If you are not using SSL you have to set true to attribute "mail.smtp.starttls.enable". You don't have to set the FROM attribute as the user you provided in authentication will be automatically used as the FROM attribute.

package tr.com.aligelenler;

import java.text.SimpleDateFormat;

import java.util.Date;
import java.util.Properties;

import javax.mail.Authenticator;
import javax.mail.Message;
import javax.mail.MessagingException;
import javax.mail.PasswordAuthentication;
import javax.mail.Session;
import javax.mail.Transport;
import javax.mail.internet.InternetAddress;
import javax.mail.internet.MimeMessage;

public class SendMailUseGmail {

private static final String USER = "your_email@gmail.com";
private static final String PASSWORD = "your_app_password";

public static void main(String[] args) {
try {
Properties props = new Properties();
props.put("mail.transport.protocol", "smtp");
props.put("mail.smtp.auth", "true");
props.put("mail.debug", "true");
props.put("mail.smtp.host", "smtp.gmail.com");

1 props.put("mail.smtp.port", "587");
2 props.put("mail.smtp.starttls.enable", "true");

3 //props.put("mail.smtp.socketFactory.port", "465");
4 //props.put("mail.smtp.socketFactory.class", "javax.net.ssl.SSLSocketFactory");

Session session = Session.getInstance(props, new Authenticator() {
@Override
protected PasswordAuthentication getPasswordAuthentication() {
return new PasswordAuthentication(USER, PASSWORD);
}
});
MimeMessage msg = new MimeMessage(session);
// msg.setFrom(new InternetAddress(USER)); No need to specify FROM attribute
msg.addRecipients(Message.RecipientType.TO, InternetAddress.parse("sendmail1@gmail.com, sendmail2@gmail.com"));
msg.setSubject("You have a new mail");
msg.setText("This is a test message send at " + new SimpleDateFormat("dd.MM.yyyy HH:mm:ss.SSSZ").format(new Date()));
Transport.send(msg);
} catch (MessagingException e) {
System.out.println(e.getMessage());
}
}

}

Reading Mail Using Gmail POP3 or IMAP Server:

     You can use the following java code to read your gmail inbox folder.The code that delete your mails is not working here, that's because i think a restriction of gmail server to prevent accidentally deleting emails. Here I use imap as the mail fetch protocol.If you want to use pop3 protocol you have to change the properties as below. Using SSL is mandatory when reading your emails.

props.put("mail.store.protocol", "pop3");
props.put("mail.pop3.host", "pop.gmail.com");
props.put("mail.pop3.socketFactory.port", "995");
props.put("mail.pop3.socketFactory.class", "javax.net.ssl.SSLSocketFactory");

package tr.com.aligelenler;

import java.io.IOException;
import java.util.Properties;

import javax.mail.Authenticator;
import javax.mail.Flags;
import javax.mail.Folder;
import javax.mail.Message;
import javax.mail.MessagingException;
import javax.mail.PasswordAuthentication;
import javax.mail.Session;
import javax.mail.Store;
import javax.mail.internet.MimeMessage;

public class ReadMailUseGmail {

private static final String USER = "your_email@gmail.com";
private static final String PASSWORD = "your_app_password";
private static final boolean CLEAR = false;

public static void main(String[] args) {
Store store = null;
Folder inbox = null;
try {
Properties props = new Properties();
props.put("mail.store.protocol", "imap");
props.put("mail.imap.host", "imap.gmail.com");
props.put("mail.imap.socketFactory.port", "993");
props.put("mail.imap.socketFactory.class", "javax.net.ssl.SSLSocketFactory");
props.put("mail.debug", "true");

Session session = Session.getInstance(props, new Authenticator() {
@Override
protected PasswordAuthentication getPasswordAuthentication() {
return new PasswordAuthentication(USER, PASSWORD);
}
});
store = session.getStore();
store.connect();
Folder root = store.getDefaultFolder();
inbox = root.getFolder("inbox");
inbox.open(Folder.READ_WRITE);
Message[] mails = inbox.getMessages();
if (mails.length == 0) {
System.out.println("There are no messages");
}
for (int i = 0; i < 10; i++) {
MimeMessage mail = (MimeMessage) mails[i];
System.out.println("From: " + mail.getFrom()[0]);
System.out.println("To: " + mail.getRecipients(Message.RecipientType.TO)[0]);
System.out.println("Subject: " + mail.getSubject());
System.out.println("Content: " + mail.getContent());
if (CLEAR) {
mail.setFlag(Flags.Flag.DELETED, true);
}
}
} catch (MessagingException e) {
System.out.println(e.getMessage());
} catch (IOException e) {
System.out.println(e.getMessage());
} finally {
try {
if (inbox != null && inbox.isOpen())
inbox.close(true);
if (store != null)
store.close();
} catch (MessagingException e) {
System.out.println(e.getMessage());
}
}
}
}

Conclusion:

    Today I showed how to use simple JavaMail API using Gmail servers to send and read emails.The only trick is to obtain a application password to use in the authentication of Gmail server.

You can download the source code from here.

Sunday, November 9, 2014

Using JavaMail API

Introduction:

     I'll mention about the JavaMail API today.Before go into the details of the API we'll first look at the well known e-mail protocols SMTP, IMAP and POP3.After that we'll see how to use and configure Apache James server to use in our examples.

SMTP, IMAP and POP3 Protocols:

     These are all TCP/IP protocols used for mail delivery.In summary, when you send an email to someone, your email client first connects to your email server.Then your email server uses the receipent email address to determine where the mail will have to go and delivers the mail to the target email server.Up to now the SMTP protocol is used.When the receipent want to see the email that you send she asks to her email server to see the email.At this time IMAP or POP3 has to be used.

SMTP stands for Simple Mail Transfer Protocol and is used when email is delivered from the email client to the server or email is delivered from one email server to another. The default SMPT port is 25.When you are sending an email your email client first contact with the SMTP server in the mail infrastructure.If configured so, SMTP server can authenticate you and then deliver your mail to the target server.After sending the email, the mail client may either keep the sent mail in local sent mail folder as in the POP3 protocol or sent mail folder on the server as in IMAP.

POP3 stands for Post Office Protocol and if you use POP3, when you want to see your emails, the emails will be downloaded from the mail server to your local drive deleting the emails on the server's drive which means you work as offline. POP3 is simpler than IMAP and doesn't offer some of the features of IMAP.The default POP3 port is 110.

IMAP stands for Internet Message Access Protocol and if you use IMAP, when you want to see your emails, besides the ability of downloading the emails to the local drive, they still be kept on the server's drive.Because of that IMAP requires more disk space and more CPU power on the mail server than POP3.The default IMAP port is 143.

Download and Configure the Apache James Email Server:

     First go to the page http://james.apache.org/download.cgi and download the latest stable version of Apache James Server.(At the time of this write it is 2.3.2 version).
Next, you have to configure config.xml according to your need.The config.xml should be under ${JAMES_HOME}/apps/james/SAR-INF directory. Some of the configuration values are listed below.You can change the email delivery method either as pop3 or imap, or you can change the port values like below.
* servername -> localhost...
* pop3server -> port 1110...
* smtpserver -> port 1125...

You can also configure your James server according to the instructions listed in this link.These configuration files should be in ${JAMES_HOME}/apps/james/conf directory.

In the config.xml you may also configure the gateway, gatewayPort,gatewayusername and gatewayPassword properties to be able to send emails to an external SMTP server.Remember however that, if you want to send email to an external SMTP server, you may need to sure that your James server IP address and your domain IP address are same.That's because Email servers do a reverse dns query by comparing the IP of the domain and the IP of the sender email server and doesn't accept the email if they are not the same.You can get more information about reverse dns from this link.

After completing the configuration you can now go to the bin directory and run the run.bat or run.sh file.Be sure to set the JAVA_HOME environment variable at this point. You should see the following command lines now.

Using JavaMail API
Figure 1

You can now connect to the James server by telnet using the following command.

Figure 2

If you are using windows 7 you can enable the telnet as shown in this link.
Enter root for login id and password and use the adduser command to add users as shown in the following figure.We add two users admin and test to use in our examples.

Figure 3

Java Mail API:

     To use Java Mail API you need to download the required jar from this link.You just need javax.mail.jar which include SMTP, IMAP and POP3 protocol providers.

Sending Email:

     Below java code is an example of sending an email from the "admin" user to the "test" user we have just created.

package tr.com.aligelenler;

import java.text.SimpleDateFormat;
import java.util.Date;
import java.util.Properties;

import javax.mail.Authenticator;
import javax.mail.Message;
import javax.mail.MessagingException;
import javax.mail.PasswordAuthentication;
import javax.mail.Session;
import javax.mail.Transport;
import javax.mail.internet.InternetAddress;
import javax.mail.internet.MimeMessage;

public class SendMail {

    private static final String USER = "admin";
    private static final String PASSWORD = "admin";
    public static String FROM = "admin@localhost";
    public static String TO = "test@localhost";

    public static void main(String[] args) {
        try {
            Properties props = new Properties();
            props.put("mail.transport.protocol", "smtp");
            props.put("mail.smtp.host", "localhost");
            props.put("mail.smtp.port", "1125");
            props.put("mail.smtp.auth", "true");
            props.put("mail.debug", "true");
            Session session = Session.getInstance(props, new Authenticator() {
                @Override
                protected PasswordAuthentication getPasswordAuthentication() {
                    return new PasswordAuthentication(USER, PASSWORD);
                }
            });
            MimeMessage msg = new MimeMessage(session);
            msg.setFrom(new InternetAddress(FROM));
            msg.addRecipients(Message.RecipientType.TO,InternetAddress.parse(TO));
            msg.setSubject("You have a new mail");
            msg.setText("This is a test message send at " + new SimpleDateFormat("dd.MM.yyyy HH:mm:ss.SSSZ").format(new Date()));
            Transport.send(msg);
        } catch (MessagingException e) {
            System.out.println(e.getMessage());
        }
    }
}

This code will send an email from admin to test and you can check that mail by using the following command lines in Figure 4 after typing the telnet localhost 1110.

Using JavaMail API
Figure 4

You can also use the following properties rather than using the 
msg.setFrom(new InternetAddress(FROM)); line.
   props.put("mail.host", "localhost");
   props.put("mail.user", "admin");

Here we see the USER and the FROM values are same.Actually if the SMTP authentication enabled,the USER given in the authentication is used as the FROM attribute if your user is not an administrator roled user, so there is no need to define FROM attribute.However if the STMP authentication is not enabled you need to set FROM attribute or use the "mail.user" property.

Reading and Deleting Email:

     Below java code is an example of reading and deleting inbox folder of the test user.The user provided with the password in the authenticator which is "test" is used to fetch the inbox.

package tr.com.aligelenler;

import java.io.IOException;

import java.util.Properties;

import javax.mail.Authenticator;
import javax.mail.Flags;
import javax.mail.Folder;
import javax.mail.Message;
import javax.mail.MessagingException;
import javax.mail.PasswordAuthentication;
import javax.mail.Session;
import javax.mail.Store;
import javax.mail.internet.MimeMessage;

public class ReadMail {

private static final String USER = "test";
private static final String PASSWORD = "test";
private static final boolean CLEAR = false;

public static void main(String[] args) {
Store store = null;
Folder inbox = null;
try {
Properties props = new Properties();
props.put("mail.pop3.host", "localhost");
props.put("mail.pop3.port", "1110");
props.put("mail.store.protocol", "pop3");
props.put("mail.debug", "false");
Session session = Session.getInstance(props, new Authenticator() {
@Override
protected PasswordAuthentication getPasswordAuthentication() {
                          return new PasswordAuthentication(USER, PASSWORD);
                         }
});
store = session.getStore();
store.connect();
Folder root = store.getDefaultFolder();
inbox = root.getFolder("inbox");
inbox.open(Folder.READ_WRITE);
Message[] mails = inbox.getMessages();
if (mails.length == 0) {
System.out.println("There are no messages");
}
for (int i = 0; i < mails.length; i++) {
MimeMessage mail = (MimeMessage) mails[i];
System.out.println("From: " + mail.getFrom()[0]);
System.out.println("To: " + mail.getRecipients(Message.RecipientType.TO)[0]);
System.out.println("Subject: " + mail.getSubject());
System.out.println("Content: " + mail.getContent());
if (CLEAR) {
mail.setFlag(Flags.Flag.DELETED, true);
}
}
} catch (MessagingException e) {
System.out.println(e.getMessage());
} catch (IOException e) {
System.out.println(e.getMessage());
} finally {
try {
if (inbox != null && inbox.isOpen())
inbox.close(true);
if (store != null)
store.close();
} catch (MessagingException e) {
System.out.println(e.getMessage());
}
}
}
}

The output of this java program will be the following.

From: admin@localhost
To: test@localhost
Subject: You have a new mail
Content: This is a test message send at 09.11.2014 15:22:08.841+0200

If you change the CLEAR property to true the inbox folder will be cleared.
When we are reading or deleting email we must provide the username and password using the Authenticator class and the fetched mails will be the mails of the provided user.

Conclusion:

     We see how to send email using SMTP protocol and read/delete email using POP3 protocol using Apache James Server after describing the email protocols and understanding the James server configuration.Normally you need to enable authentication of your SMTP server for security reasons and your client should provide the username and password using the Authenticator class.In this way your authentication user will be the sender.Similarly when you want to read your emails you must provide your username and password.

You can download the source code from here.